My Simple Homelab Setup
July 02, 2024Building a homelab is an exciting way to explore technology and learn new skills. Having your own homelab can be both educational and rewarding. In this post, I’ll take you through my simple homelab setup, housed in a small rack, and walk you through the components that make it tick.
The Components
Here’s a quick overview of the gear that makes up my homelab:
- Raspberry Pi 4B
- KVM Switch
- Audio Mixer
- Small Entry-Level Network Switch
- Single-Drive NAS
- Uninterruptible Power Supply (UPS)
Raspberry Pi 4B
The centerpiece of my homelab is the Raspberry Pi 4B. This tiny but powerful device serves as the brain of my operations. With a quad-core Cortex-A72 (ARM v8) processor, 4GB of RAM, and Gigabit Ethernet, the Raspberry Pi is a versatile tool that allows me to run various applications and services.
I leverage the power of Docker on my Raspberry Pi to self-host a multitude of applications. Docker provides a lightweight, consistent, and isolated environment to run various applications seamlessly. Here’s a look at the Dockerized services I run on my Raspberry Pi:
-
Mailserver: I self-host my own mail server, which allows me to manage email accounts without relying on external services. It provides privacy and control over my email communications.
-
Nextcloud: Nextcloud is my personal cloud storage solution. It offers file sync and sharing capabilities similar to Google Drive or Dropbox but with complete ownership and control over the data.
-
Home Assistant: This open-source platform is my go-to for home automation. It integrates with smart devices in my home, allowing me to automate and control everything from lights to thermostats.
-
Firefly III: Firefly III is a personal finance manager that helps me keep track of my expenses, budgets, and financial goals.
-
Pi-hole: As a network-wide ad blocker, Pi-hole improves my browsing experience by blocking intrusive ads and unwanted content across all devices on my network.
-
WireGuard: WireGuard is my choice for a fast and secure VPN solution, enabling secure remote access to my network and protecting my online privacy.
-
Nginx Proxy Manager: This tool simplifies the management of reverse proxies, allowing me to easily route traffic to different applications running on my network.
-
Portainer: Portainer provides a user-friendly interface to manage Docker containers, making it easy to deploy, monitor, and maintain all my Dockerized applications.
-
Bitwarden: Bitwarden is my self-hosted password manager, ensuring my credentials are stored securely and are accessible only by me.
-
Uptime Kuma: This application monitors the availability and performance of my services, alerting me to any downtime or performance issues.
-
Gitea: Gitea is a self-hosted Git service, providing me with version control and repository hosting for my coding projects.
-
Woodpecker CI: Woodpecker is my continuous integration and delivery (CI/CD) system. It connects directly with Gitea.
-
n8n: n8n is an open-source workflow automation tool that allows me to create custom workflows and integrations between different services.
-
Grafana: Grafana is a powerful analytics and monitoring platform. I use it to visualize and analyze data from various sources, including my home network and applications.
-
Wiki.js: Wiki.js is my personal knowledge management system. It’s a robust, self-hosted wiki solution for documentation and note-taking.
-
code-server: code-server lets me run Visual Studio Code in the browser, giving me a powerful, full-featured development environment accessible from anywhere.
-
Jellyfin: Jellyfin is my self-hosted media server. It organizes and streams my movies, TV shows, and music across all my devices without relying on proprietary platforms.
-
Penpot: Penpot is an open-source design and prototyping tool. I use it for collaborative UI/UX design work, making it a great self-hosted alternative to Figma.
-
PrivateBin: PrivateBin is a minimalist, open-source pastebin that encrypts and decrypts data in the browser. I use it to share snippets of text or code securely, knowing that the server has zero knowledge of the contents.
-
Reactive Resume: Reactive Resume is an open-source resume builder. It allows me to easily create, update, and export professional-looking resumes in multiple formats.
-
DevDocs.io: DevDocs combines documentation for dozens of programming languages and frameworks into a single, fast, searchable interface. I self-host it locally so I can access API references and docs instantly even when I’m offline or working on isolated environments. It’s lightweight, works entirely in the browser, and lets me choose exactly which document sets to include. An absolute must-have for any developer who values speed and focus.
-
IT-Tools: IT-Tools is a collection of handy, web-based utilities aimed at developers and system administrators. I self-host it as a Swiss-army knife for everyday tasks such as encoding/decoding, JSON formatting, UUID generation, password utilities, and more. Having these tools locally ensures speed, privacy, and availability without relying on third-party websites.
-
TileServer GL: TileServer GL is a self-hosted map tile server that serves vector and raster tiles from OpenStreetMap and other sources. I use it to host my own map infrastructure, which is ideal for custom applications, dashboards, or internal tools that require maps without external API dependencies. It gives me full control over styling, data sources, and availability.
-
Kiwix: Kiwix allows me to host and access offline copies of websites such as Wikipedia. By self-hosting Kiwix, I ensure instant, bandwidth-free access to vast amounts of knowledge, even without an internet connection. It’s an excellent resource for learning, reference, and long-term knowledge preservation.
-
Kavita: Kavita is my self-hosted digital library server for managing and reading eBooks. It automatically organizes content into libraries, tracks reading progress, and provides a clean, responsive web reader that works great across desktop and mobile devices. I use it to keep full control over my digital collection while enjoying features like metadata management, bookmarks, and user accounts for a polished, personal reading experience.
-
EmulatorJS: EmulatorJS is my go-to solution for self-hosting retro gaming in the browser. It allows me to run classic console games directly from a web interface with controller support, save states, and customizable settings. By hosting it myself, I can build a private, web-based retro gaming hub without relying on third-party services, keeping everything fast, portable, and entirely under my control.
Why Self-Hosting?
Self-hosting offers numerous benefits, including:
- Privacy: Keeping data private and under my control.
- Customization: Full flexibility to tailor applications to my specific needs.
- Learning Experience: Hands-on experience with server management, networking, and application deployment.
The Raspberry Pi’s compact size and low power consumption make it perfect for running these services 24/7 without significant energy costs.
KVM Switch
A KVM (Keyboard, Video, Mouse) switch is an invaluable part of my setup. This device allows me to control multiple systems with a single keyboard, monitor, and mouse. While my homelab is simple, having a KVM switch makes it easy to manage my Raspberry Pi and any additional devices I might add in the future without the clutter of extra peripherals.
Audio Mixer
An audio mixer might not be a typical component in a homelab, but it’s a fantastic addition. I use my mixer to manage audio inputs from various devices.
Small Entry-Level Network Switch
Networking is a core aspect of any homelab, and a small entry-level network switch plays a crucial role in connecting my devices. The switch I use is an 5-port unmanaged Ethernet switch, which is more than sufficient for my current needs.
Single-Drive NAS
Adding a single-drive NAS (Network Attached Storage) to my homelab has been a game-changer for handling data storage. The NAS provides a centralized place to store files, backups, and media libraries, accessible from any device on my network. While it’s a single-drive setup, it offers flexibility and convenience, making it a perfect addition to my homelab.
Uninterruptible Power Supply (UPS)
Power reliability is crucial for any homelab, and an Uninterruptible Power Supply (UPS) is a key component that ensures everything runs smoothly, even during power outages. The UPS provides backup power and protection against surges, keeping my equipment safe and operational.
Rack Setup
Most of these components are housed in a compact rack, which keeps everything organized and accessible. The rack is small enough to fit comfortably in a corner of my office.
One unique aspect of my rack setup is that everything is “ghetto mounted” using Velcro strips. Instead of using traditional mounting techniques or brackets, I’ve embraced a more DIY approach. This method makes it incredibly easy to rearrange components, swap out hardware, and ensure cables are neatly organized without permanent fixtures.
Velcro allows for flexibility and creativity in arranging devices within the rack. If something needs adjustment or replacement, I can quickly make changes without tools or dismantling the entire setup. This approach emphasizes the adaptability of my homelab and adds a personal touch to how everything is housed and maintained.
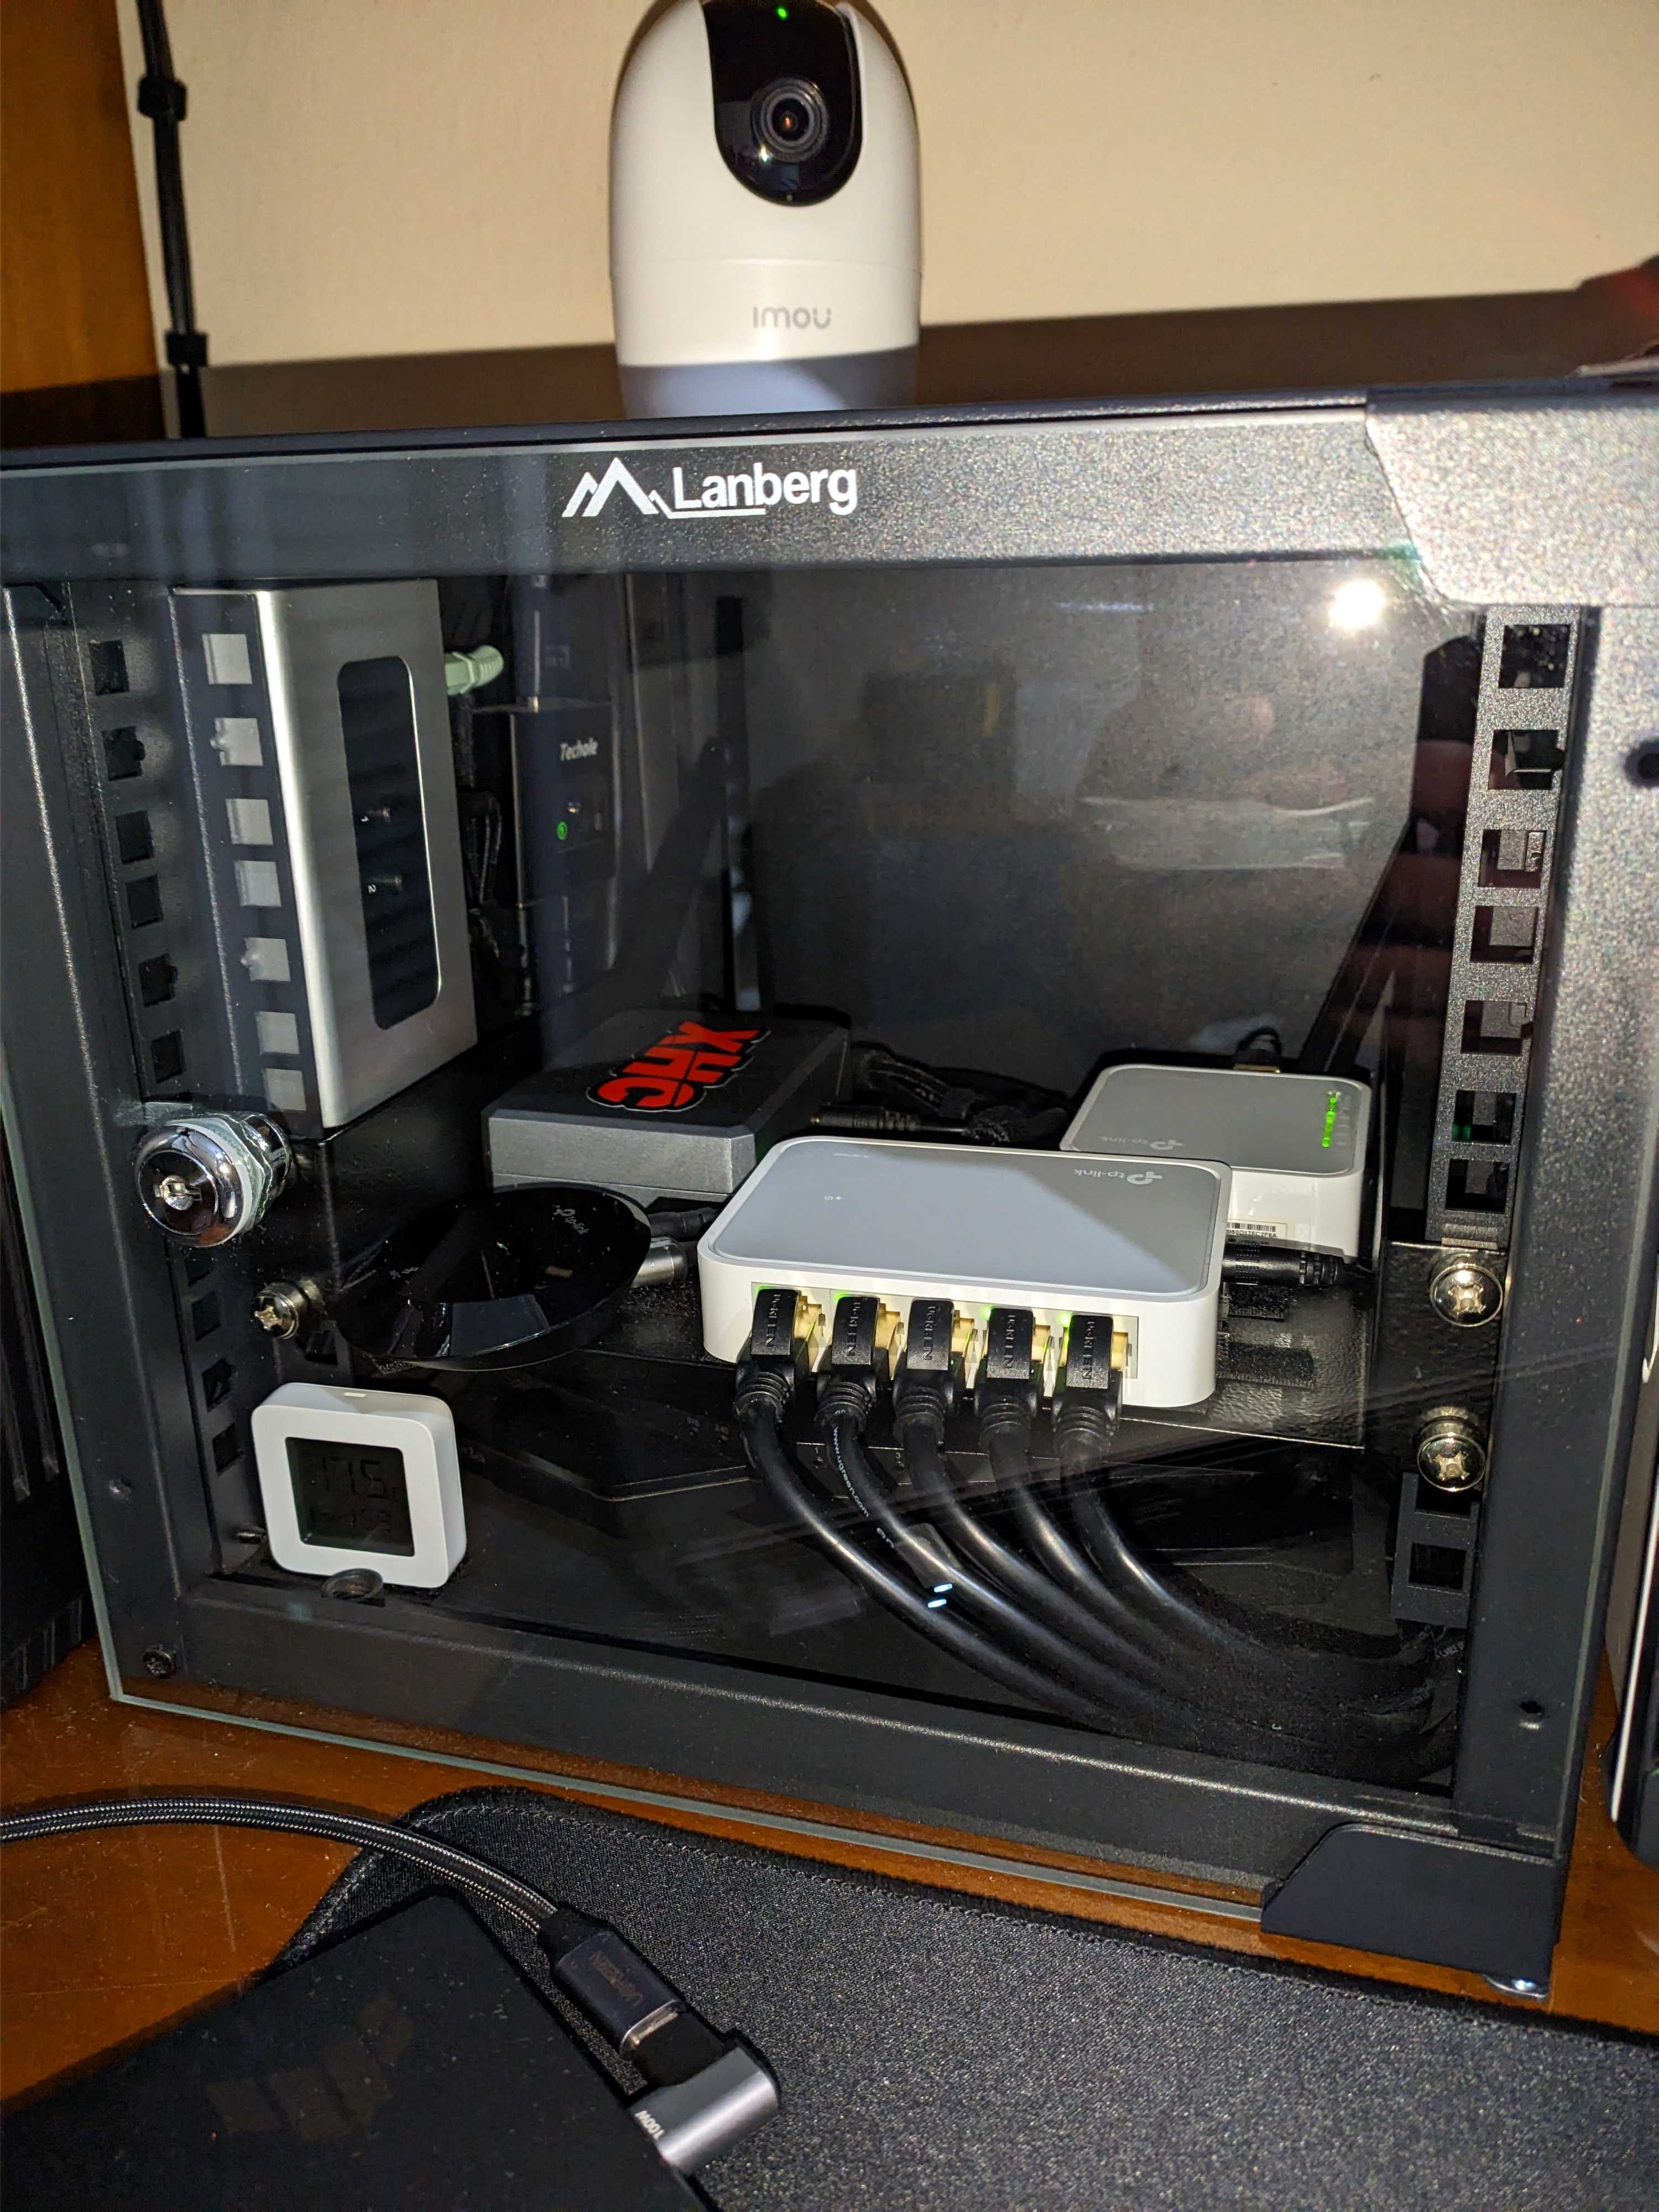 (My actual rack.)
Why a Simple Setup?
Simplicity doesn’t mean limitations. Even with this basic setup, I have plenty of room to explore and expand my technical skills.